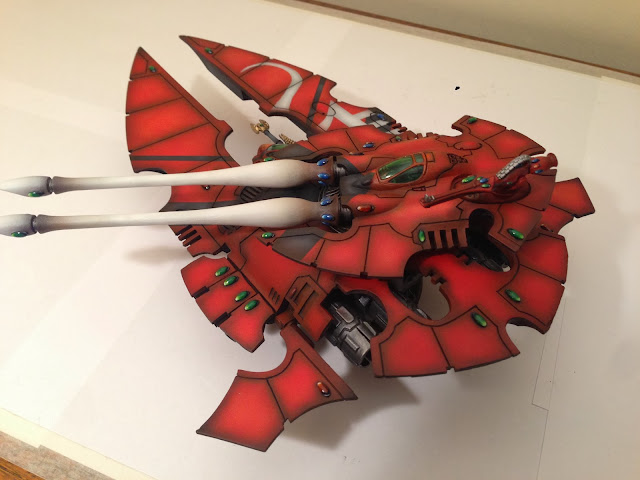
Forge World Scorpion Type II – Saim-Hann
With my first project under my belt, I dug out a Forge World kit that had been left under the bed for a good number of years. I could not ge the smooth finish I wanted so parked the model to one side, but never came back to it. All the practicing of pre-shading, zen highlighting and shading using the Falcon kits drove me to dig it out and get it done. This will be more step by step but do ask questions below if you want something made clearer. Again, Buypainted! gave a vast amount of guidance and inspiration - credit where credit is due!
1. The main hull was constructed, wing-lets, tail section etc. The turret was also built however don’t do what I did initially and leave the pulsars sperate. The crew and smaller weapons were mounted on old sprues to assist in painting. The whole lot was primed us Vallejo Polyurethane Grey Primer – great stuff, and key to get the different shades of red later on.
2. I started with the base. You cannot paint the top and bottom separately like you can with a GW Falcon so I painted the bottom first as I was more content with tidying up the underside rather than complete corrections on the top (the bit that you see and really matters). I highlighted the whole thing with VMA Black mixed with VMA white – no real measurements here, all by eye. It has to be a dark grey that’s for sure. This was repeated 3 times getting lighter and lighter. I did the underside of the turret at the same time to keep everything consistent. VMA Steel for the engines and washed as described later.
3. Edge highlighting next – and there are a lot of edges for this! VMA US light grey worked well, no fuss or mixing. At this point I sprayed the whole thing wth Vallejo Stain varnish to protect my work up to that point. Using Mig Abteilung Oils black and white spirit I made up an oil wash that was applied to the entire surface. Then using a flat, square, 15 mm wide brush with a little white spirit on board I dragged it gently over the flat surfaces to create the feeling of a fast moving vehicle (really simple, looks good too I think – MarneusAugustusCalgar does this on his Forge World Storm Eagle he entered for Golden Demon, likewise Buypainted! Does something similar - links on side bar).
4. The crew and weapons were up next. Greys, GW flesh paints and the techniques described monthly in White Dwarf were used to do their faces. Nothing really of note here. I did the grey tunics with a quick blast of grey over a black undercoat from above the model. That was literally it; came out great with some simple silver details and minimal highlights. I like painting the crew properly and neatly (the green canopy covers most of this detail but I think its worthwhile). Crew installed the Satin varnish applied – blue tac then used to hide them for a few days whilst the next stages were carried out.
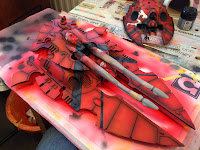
5. You can see my practice Falcon again – I tested everything before I went onto my £140 model. I think it paid off. Even just playing around with templates on curved surfaces was good learning. And what’s great about the Falcon, spray it again with the grey primer you can go again. I wish I had the picture of my Ultramarines Falcon I used to test colours for the Land Raider! Anyway, pre-shading next after using 10mm Tamiya masking tape all the way around the edge to catch overspill and minimise unwanted paint getting to the underside. VMA Black lining along all joints and VMA white gently applied to the centre of panels and the ‘shoulder’ areas at the top of the body. This was all to make the red come out in different tones. At this stage it I thought it looked great! The kit is awesome.
6. I took a piece of paper and began taking rubbings of surface areas on the kit to see where I could put a Saim-Hann symbol. This took a number of goes before settling on what I drew out later on. I also painted the sensors using Vallejo Liquid Gold and Isopropanol for better flow (see Buypainted!’s guide). Oil wash applied, left to dry before gentle dry brush with GW Mithril Silver. Gold bits done!
7. The red – VMA Ferrari Red. Awesome! Highlighted with VMA Orange and Golden Yellow along the main body ‘shoulders’ and all panels. In these pictures you can see the yellow and what I mean by ‘shoulders’ on the side of the body. The importance of the pre-shading comes in here. Even without the orange and yellow you have an awesome progression of colour across all the panels – and those big panels need it, it keeps every surface interesting and made them really stand out.
8. The red was allowed to harden up over 24hrs, then stain varnished (protect your work!), left again to harden up for 24 hrs before masking lines for the black markings. The varnish also toned the yellow down. VMA Black carefully applied then highlighted dark grey, lighter dark grey, using the a mixture by eye. You need to be really careful highlighting black like this otherwise you end up with grey….and you want black…so don’t add too much white, it really doesn’t need it and focus in the centre of the line leaving a darker out edge. Remove tape – satin varnish the lines. The next step is to begin getting nervous about this wonderful stencil you have produced that will look great – or wreck the paint job you just spent 4 days putting together….
9. This stencil was fun to make. I did a concept test on the Falcon funnily enough! A sharp knife and specialist model masking tape paper is required to make it. I drew my design over the rubbing I took from the hull and then carefully applied the tape paper on top and cut round using the freshest sharpest, scalpel I could find. The template breaks up nicely into three parts that then need carefully lined up on the hull and over the engine intake. I used a rubber brush to press the tape down hard (the varnish is there to protect your work and you need to push down hard to stop the tape coming away and white paint leaking onto the red – disaster at this stage…). Oodles of tape to protect from over spill from the airburs, then paint with a dark ‘light white/grey’, then a ‘light white/grey’ then pure white. Leave the edges darker and focus on the central areas of the stencil getting lighter. Sorry I cannot be more descriptive of the white highlights. You need a tiny amount of black to make the grey even for the base colour before reducing the black quantity again to get the middle shade.
10. Peel off the masking tape and sit back happy knowing, for me anyway, this is the best thing I have produced to date. Varnish - 24hrs - then oil wash black along all edges and in the gaps.
11. Pulsars – VMA Burnt Umber base coat over grey primer, then 50:50 VMA Burnt Umber/Sandy Brown, then 25:75 Burnt Umber/Sandy Brown, then Sandy brown, then Sandy brown and white, Sandy brown and more white then white. I think there were 6-7 different mixes to get this blend to work from dark brown down to white – worth the effort. You need to leave a little showing and play with over spill from the airbrush. I had never painted anything like this before and just judged it as I went, but rest assured it is not hard, just watch your trigger finger on the airbrush (practice on the Falcon helping out again).
12. Canopies – X-25 Tamiya Clear Green and X-20A Tamiya Acrylic thinner (1:4 mix) speedily applied to the inside of the canopy. It dries fast and gets sticky – if you try and paint it slowly with a small brush you will mess it up. Get a big brush (GW wash brush) and get it on there with a few sweeps of the brush and set it down to dry. I used clamps and had it angled as shown. It moves as it dries leaving the upper part of the canopy green but more transparent so you can see the crew better. Bought myself some Humbrol maskol and used the red paint scheme already mentioned leaving out the yellow. I applied the canopies using resin glue (Humbrol Clear Fix) then highlighted with yellow to blend them into the turret and hull. Using the sharp scapel I cut around the edge of maskol and revealed the finished canopy. GW black wash around the edges hid any blemishes from the maskol removing process, making the frame edges as crisp as you like.
13. The gems were painted using the technique lifted from the Internet shown below – sorry I cannot remember the original source and I am not taking any credit for this example below (I thought it was good as it showed me exactly what to do). The more complicated blue scheme was duplicated respectively for red and green gems. GW paints for this – you don’t need more than shades 2 shades and white/black e.g Caliban Green and Moot Green. Using black and white you can mix any shade under the sun to get your blended progression.
14. The base – I think I may tackle this separately. I fitted a magnet to the hull ordered from First4Magnets in the UK. The beast in the base is 10mm deep and 10mm in diameter. It has enough pull to hold the base to the model securely (it is a heavy solid bit of resin). Green stuff and a thinner magnet sits where the ball joint fits to the model. I don’t like the clear bases and wanted to do something more interesting so cut down one of the urban barricades available from GW (£15…grrr, but have spares to do my planned Cobra.... :) ). Using the round base provided in the kit and green stuff I built it into the bike you can see then used gravel/sand to mask it accordingly. Using a pillar drill and the bench they have, I drilled a hole progressively bigger so as not to over stress the very soft plastic (relatively speaking). By using the pillar drill the magnet popped in perfectly true, leaving it squared off perfectly, flat on top. With some grey and brown paint, a little dry brushing and some pieces of slate you get the base you see here.
15. And that’s it! After the Eldar release I sent a few pictures to the White Dwarf team and was shocked that they used it on the main website when Apocalypse came out soon after. I want to do some more Saim-Hann as I like the red and bone colours achieved here. My edge highlighting could be better and I may try painting the gems first with an airbrush, maskol them, then complete the paint scheme to reveal perfectly blended gems. We shall see – room for improvement! Back to the Ultramarine back log for now though.


thanks for sharing! great job. i' super impressed with the white on how you did your logo. I'm a fan of buy painted too. He's very inspirational, but YOU are too! Maybe I can become as good as you! I just got me air compressor and airbrush setup. I'm also doing a saim hann army.
ReplyDeletehow can I get in touch? I have some questions regarding painting wind riders and vypers
ReplyDelete