Ultramarines Forge
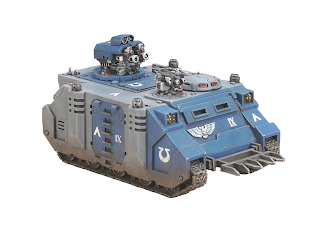
World Rhino/Razorback WIP
With the first of my
10 man tactical squads for my 1000pts Ultramarines Army complete, it took little
convincing to revert back to armour, looking to build a battle field taxi for them. I will do a separate
post on the second squad having used the first squad to refine the way I plan
to paint all the infantry for this force.
I am trying to build
a 35k Ultramarine force – I really like the new CSM releases (the Sternguard
and Hunter/Stalker) and want to be able to include the Forge World Heresy
designs as well. The new tactical
marines are great but I don’t want to go down the road of full Heresy or full
40k… anyway. In short I want to
mix the elements of GW I like with the FW stuff. The best way I can make this work in my opinion is experimenting
with paint schemes.
I really like the
grey Razorback that pops up in the old codex and on the back of the Razorback
box. I don’t know the background
to why grey is used but I have seen Land Raider designs using it as well. I think a mixture of some
vehicles/infantry with grey panels in the design will do 2 things; 1. Give me a
unique spin on your typical Ultramarine paint scheme and 2. Meet the 35k theme
I am looking for.
With that in mind, I
got to work. I bought the
Razorback kit so I could build both a Rhino and Razorback. I bought 3mm diameter x 1 mm deep
magnets (First4Magnets) and some plasticard to enable interchangeable
fits. Forge Planet provided me
with an extra turret mount, letting me build both Lascannon and Heavy Bolter
fits for the model. Buypainted!
does an excellent tutorial on his youtube page on magnetising Rhino hatches.
So on with
painting. VMA Ivory and Sandy
brown shading produced a simple and effective interior colour scheme. Mixing brown and black together and
using a little sponge for stippling helped weather the interior. Transfers from the sheet provided in
the kit were applied.
The model was then
protected using Vallejo Satin Varnish and given an oil wash of brown/black Mig
Abteilung oil paint and white spirit.
The seats were painted VMA tank brown.
The control panel was
painted VMA US dark green and highlighted/osl’d with VMA Camo Light Green, then
Camo Light Green and some white.
The bolter metal parts were painted with VMA Steel then washed with GW
Nuln Oil.
I am really pleased
with the direction the model is going thus far. The next step will see pigments added to the floor and work
on the outside begin.
Interested to hear any
feedback on how you think it is going, what people think about my 35K grey/blue
Ultramarines idea and also happy to provide further detail on any of the stages.


Got some nice looking tanks there mate. I haven't airbrushed in over 15 years, just about to pick it up again after spending a stupid amount of money on a sweet set up. Buy painted definitely has some sweet tutorials but you should also check out orcpainternerd n awesome paint job, I've picked up some cool ideas from them.
ReplyDeleteHow long have you been brushing for? Your eldar stuff
Sorry, your eldar stuff looks awesome. I'll be keeping an eye on your progress.
ReplyDeleteHappy painting.
LinZ - firstly thank you for my first blog comment :) Awesome Paint Job and OPN are 2 channels I have also watched heavily over the last month and I agree some really good stuff in there, especially on the AK Streaking Grime effects which I hope to use on this tank and the next few projects coming up. At the moment I am sat on a Contemptor Dreadnought, a Demios Predator, A Stromraven Gunship, a Fire Raptor Gunship and a Glaive..... The blog will hopefully fill up quite a bit over the coming weeks!
ReplyDeleteCool, I'll look forward to seeing them. Got abit on your hands there eh? My cupboards completely overrun by orks waiting to be done. I'm looking at that streaking grime too, it's hard finding cheap suppliers for some things here in oz.
ReplyDeleteI am grateful to this blog site providing special as well as useful understanding concerning this subject. Sheet Metal Gauge Chart
ReplyDelete