After 2 weeks of 4-6hrs a day working
on it the job is done. I am really
pleased with the results despite initial frictions with the model and paint
application. It has come out lighter
and more worn than my other tanks, fitting in with it being an older, rarer war machine. I am very keen what
people think about the finished model and where I can look to improve on
upcoming projects, namely more infantry elite units, a Storm Raven and a Fire
Raptor.

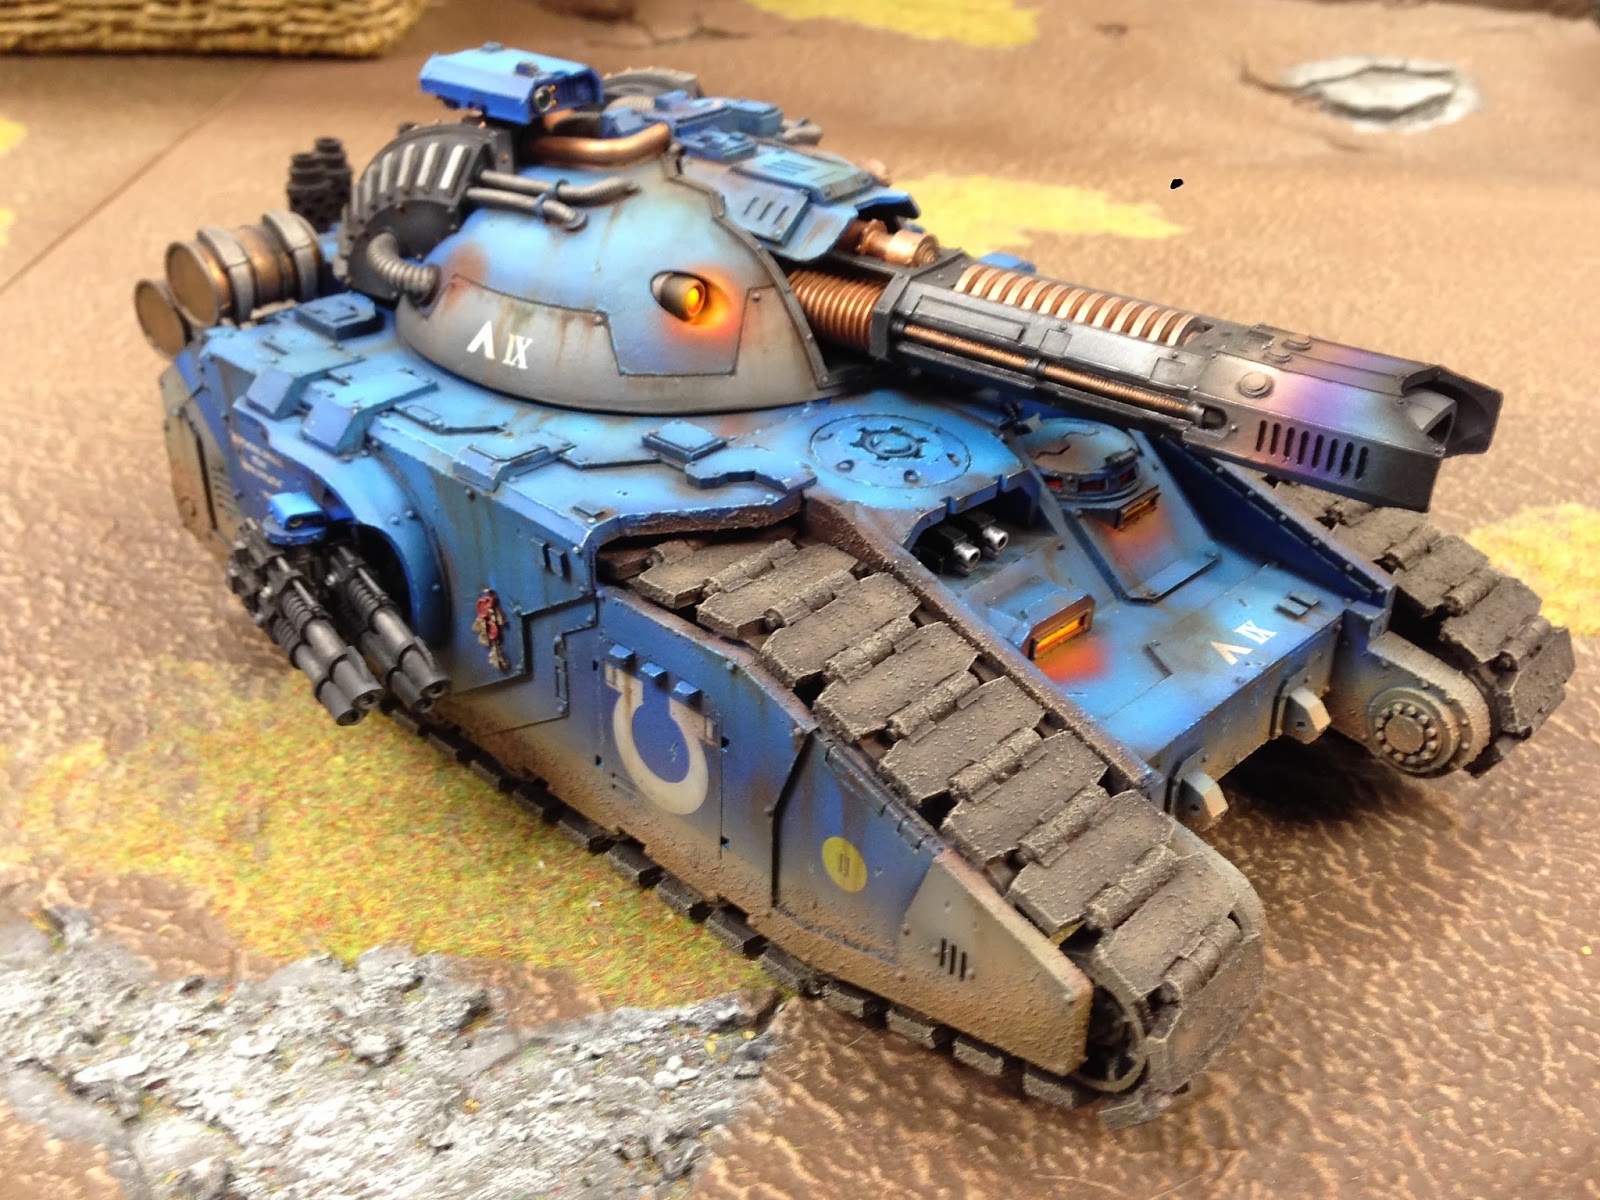

The streaking grime has worked well I think alongside the graded mud/dust up the side of the tank. This is one of my favorite products and is fun to use on the model. I think the balance between the clean chipped Grey and Blue against weathering and powder/dirt is fair and not too over powering.


The stencils I made came out very
well and I do have a preferred side of the tank if that’s possible – the XIII
side; I think that and the OSL/burnt metal features are some of the stand out points on the model. The roman numeral comes about from the Ultramarines being the 13th Legion. A tank of this size would probably be a Legion asset as opposed to a specific company asset. That said, it is attached to my second company army hence the second company yellow spot marking. Being critical I
would make the Ultramarines ‘U’ larger on the other side and should have been
more adventurous, not worrying so much about the stencil not laying flat and
paint splatter escaping the stuck down area. The heat ports on the engines are also not perfect but after
3 re-visits I stopped, as I was beginning to run the risk of ruining the thing
completely.


The burnt metal cannon is in my opinion
the best bit of the paint job – I will look to use it again on the aircraft
engines and the assault cannon for my upcoming Dreadnought (currently 5th
on my to do list – i.e. months away!).

The Vallejo Bright Bronze colour is also pretty awesome and comes up
really nicely with a light silver drybrush.

Having stupidly missed the sales of
Forge World Open Day 2014 tickets, if I can get one off eBay I will try and get
this entered into the painting competition on Sunday 30th March. It will be interesting to see how it
gets on in what is likely to be a very high standard of competition. Still, you need to be in it to win it and I think its worth a punt!

I hope you like what you
see. Those that do comment and
visit the page, thanks for the interest (just dipped over 2000 page views), its
great to share the hobby with you and hope that some of what is presented here
is useful/interesting. Any
questions do ask away and I will answer them ASAP.
HTB.
We'll HTB, you hit the nail on the head with this one, it's purdy. I agree the heat effect looks great, the streaking grimes perfect, just the right amount of chipping, colour transition. Gotta say without holding it in my hands to inspect it I can't really see any faults. Maybe I'm not 100% convinced on the dirt effecthe paintings great but maybe it's the sand particles that look a touch too big, now I'm just being picky. Anyway can't wait to see what you do on the fire raptor (hint hint). Peace out.
ReplyDeleteLinZ
Oh yeah, definitely try n get it in that painting comp. good luck.
ReplyDeleteThanks LinZ, Fire Raptor is coming I promise just need to get my working 1500pts list together so I can use the models. If only troops and infantry were as interesting as the bigger stuff ;)
ReplyDeleteCan you get a closer pic of the aquilla painted on the side of the turret? That looks like the forge world brass etch but painted on instead....was curious how you did it?
ReplyDeleteThe Aquila is a transfer from forge world. To get the painted on look do the following.
ReplyDelete1. Get the highlights and main body to the point you want to paint icons/need to oil wash the tank.
2. Satin varnish the whole model to protect the paint job.
3. Using GW gloss varnish paint the shape of the transfer onto where you want it to sit (vital step - must be gloss varnish).
4. Using microscale industries decal fix add the transfer to the model, on top of the gloss varnish.
ReplyDelete5. Use microscale industries decal sol to soften the transfer and merge the edges into the hull. Apply as many coats as you like just be careful not to move or tear the transfer.
6 Oil wash/weather the transfer as you would the rest of the tank and all being well it will be very hard to tell that it was ever a transfer!
ReplyDeleteSorry for the split reply - iPad playing up!
Ah ok. That makes sense. I have an imperial fist brass etch that looks like that and thought it was only available as a brass etch. Decal makes more sense :)
ReplyDeleteReally impressed by this tank, it's great work!
ReplyDeleteThe heat effect on the canon is impressive, and the overall weathering top notch.
There is just one thing which looks strange in my eyes : the brass/copper parts looks factory new and might want a bit of weathering love. Other than that it looks really good.
Thanks for the comment, I do see what you mean about the cleaner bronze areas - these area actually a bit dirtier when not as well lit as what you see in the photo. I don't think I will tweak it now - there would be a danger of changing something I am happy with and don't want to spoil it. I will remember the comment for the Falchion I will be finishing off soon :) Thanks! HTB
ReplyDelete